
Yesterday morning I took a shower and it worked fine.
Last night, my son got home, got into the shower and when he turned it on, the wall groaned like it was going to split! In addition, NO WATER came out of the shower head!

OH NO!
I got online and poked around and decided it had something to do with either the shower head or the shower diverter valve. The little mechanism that delivers the water to your shower head doesn't take a brain surgeon to figure out, so I thought, "I can fix that!"
Step 1.
I started by taking the shower head off to check and see if it was plugged up. We'd had a LOT of rain last week and there was lots of leaf debris in the rain gutters. I thought maybe somehow they might have also gotten into the water lines.
To remove the shower head, just unscrew it counter-clockwise. That's to the left. And if you can't remember which is which, remember "Righty-tighty and Lefty-loosy!

There WAS a bit of debris blocking the screen in the shower head, so I cleaned it out.

Step 2.
Tools. I decided I would need a phillips head screwdriver, a pair of needlenose pliers, a crescent wrench, and whatever kind of wrench that big puppy is called!


Step 3.
Remove the handle.
This bathroom faucet set has three spinning handles; one for hot, one for cold and one for the shower.

The handle was held on with one phillips head screw.

Once the screw was out, the handle just pulled right off.
Step 4.
Remove the cover. Grab hold and twist to the left. In this case, I had to use a blade to cut through the caulking around the seam first. Then it just screwed right off.


Step 5.
Remove the valve diverter.
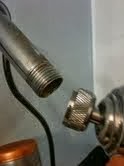
That thing you see sticking out is the valve diverter.
It is just slipped into the hole - not screwed - but there is an air seal that has to be broken.
So we tugged and tugged and gently rocked it back and forth and couldn't get it out.

See that nut right inside the hole? That brass nut? Well, I managed to get those big locking pliers around it and turn it gently to the left. Just a wee bit and it came loose. Then I just pulled the valve diverter straight out of the hole.
This is what it looks like:

I looked it over and couldn't figure out where it might be broken.
The O-ring (white) seemed to be fine.
There was a black O-ring on the end of it, held by a screw.
You can see this at the right end in the photo.
The screw didn't appear to be tight.
So I tightened it down.
Everything else seemed to look ok, so I thought I'd take a chance and just put it back in.
And guess what?
IT WORKED!
Hooray!
I just saved a HUGE plumbing bill and fixed my shower diverter valve.
One tip.
When you're turning on or off the shower, just turn the valve enough to get the water coming out of the shower completely. If you over tighten it, you can unscrew the diverter from the inside, causing another problem.
So there you go.
A 61 year old grandma fixed the shower head.
Not bad, huh?
I encourage you to...

Love,
Annie
Legendary, you're certainly not a drip when it comes to fixing leaks:)
ReplyDelete